Quilt Patterns Clip Art 8 X 10 Page Backgrounds Templates Ms Word
- Dwelling
- Free Quilt Cake Patterns
- Free Quilting Templates
How to Print and Employ Free Quilting Templates
Easy to Use. Fast to Impress. Always Accurate.
Free quilting templates are provided whenever they are needed to create 1 of the many quilt cake patterns on the Generations Quilt Patterns website.
Follow this quick guide to insure they are printed and cut so that your patches are exactly the right size.
Yous'll acquire almost the template material I apply, how to impress and how to cutting using these gratuitous printable templates.
Let'due south become started!
Newspaper for Printed Quilting Templates
Regular old printer newspaper is all I use. Nothing special.
Since we'll be using our rotary cutter, there's no need for thicker or sturdier templates. If ane gets messed up, simply print some other.
If you find y'all exercise need a sturdier template, try using a card stock—commonly the 67lb weight from the part supply store.
If you'd similar templates with their own 'stick', endeavour a printable Freezer Paper like the one from C&T Publishing (right).
It'southward pricey, but information technology'southward already cut to 8-1/2" 10 eleven" and is flat—something that your Reynold's on a roll isn't. It comes 30 sheets/package.
C. Jenkins offers pre-cut freezer newspaper in two sizes: viii-one/2"x11" and 12"x15".
You MUST use an inkjet printer because it doesn't make heat. NO Light amplification by stimulated emission of radiation or LASERJETS!
Lasers create oestrus to set up their toner. That heat melts the plastic blanket on the freezer newspaper, messing upward the inside of your printer.
No rut equals no melting. It's as simple as that!
Press Gratis Quilting Templates and Patterns
Always, always, always apply the free Adobe reader programme to print the quilting templates and paper piecing patterns. (Click hither to get your free download of it if yous don't have the latest version already.)
While I create the PDF files in a program called 'Nitro Pro' and I have PDF opening/press capabilities in my wordprocessing software, ONLY ADOBE consistently prints the pages correctly. Below is what a messed upwards i looks like—ugh! All that work for nil... unless you use Adobe .
 A partial screenshot of a template page printed with a program other than Adobe. The ruby arrows point to mistakes caused by the non-Adobe reader.
I add grainline arrows to the quilting templates when it makes a divergence in the final cake.
The grainline arrows show the direction the templates should be laid out on the fabric. The pointer should ever be parallel to the selvedge. On templates with two arrows, just cull 1. The other will, by default, be on the crosswise grain, just as information technology should exist.
Patches cutting on grain create blocks whose outside edges are stable and less likely to stretch throughout construction. (Click here for more information on grainline and why information technology's important in our quilts.)
Only in Adobe do those arrows print correctly. Period.
![]() Select the print icon in the top bar
Select the print icon in the top bar
In other programs they are either positioned completely wrong (as shown above) or they've disappeared.
After y'all've opened the PDF quilting template file in Adobe, click on the impress icon in the top bar.
This brings you to the Print screen.
Become down the left side until you lot come to 'Custom Scale' nether 'Page Size and Treatment'. Set it to '100%'.
 Page Preview in the Adobe Print carte du jour
In the preview page in a higher place you can see the grainline arrows ARE in the right position—inside the solid stitching lines.
Fill in the number of copies you'd like at the top and click print.
On PDF template and paper piecing pattern pages printed from the Generations Quilt Patterns site, you'll always detect a small foursquare on the page (beneath, left). This square measures 1" exactly when it's printed correctly (below, right).
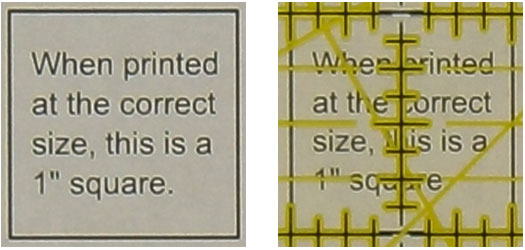 The 1" square--larger than life. Perfection!
Take the time to measure it with your ruler.
Smart Tip!
To conserve newspaper, print one re-create. Check the one" square for accuracy. If y'all're right on, print every bit many copies as you'd similar.
Cutting Patches with Templates
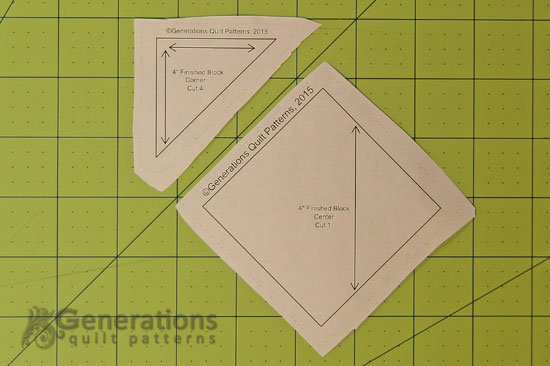
All the gratuitous quilting templates on this site have a solid black stitching lines but similar the templates for the four" Finished Diamond in a Foursquare block that is shown in the following case. (Click here to print a copy for yourself.)
If you look closely yous'll also see faint dashed lines a quarter inch from the solid ones. This is ideally the cut line for the patch.
Whenever possible, I prefer to cut the patches with my rotary ruler for speed and accuracy.
Follow these instructions for patches with straight edges.
With a scissor cut around the template shape just past the dashed line. Don't carp with existence exact. Yous just desire to remove the backlog paper, leaving the solid stitching line intact.
 Nothing fancy near this cut!
Next lay your template printed side up on the right side of your fabric. Align any arrow and then that it is parallel to the selvedge edge or lengthwise grain of your fabric.
 The template sides are taped down--you tin simply barely make out the tape.
I like to use a bit of Scotch® Make Magic™ Tape to record the template to the fabric. It won't move around when I'k cutting. This type of record doesn't leave backside any residue.
If y'all printed yours on printable freezer paper, iron them to the correct side of the fabric with a dry out iron.
Lay the 1/4" line of your ruler directly on meridian of the solid cutting line.
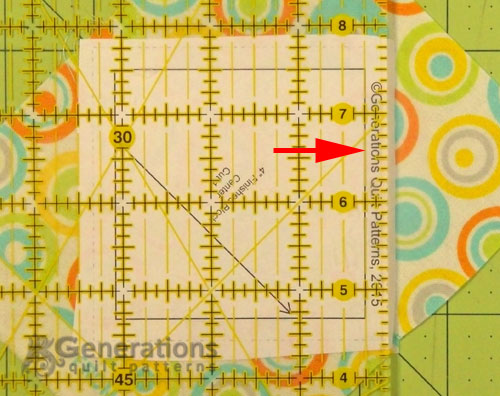 It'southward much easier to see the stitching line and add a ane/4" seam allowance than effort to line the border of the ruler upward with the calorie-free dashed cutting line.
Trim away the backlog with your rotary cutter.

Plow the mat to the next side. Repeat until every side is trimmed.
Smart Tip!
A smaller mat or a rotary mat (my favorite) are perfect for cutting quilting templates. You move the mat and not the fabric. It makes for more accurate cuts and almost no re-positioning of the templates.

The center of our Diamond in a Square unit has the grainline running straight from point to point. You tin see that the excess newspaper is fastened with our Magic™ Tape. There is tape on the template and none on the material patch.
FAQs
How many layers of fabric can I cut at one time?
This depends on you. You'll be most authentic with just one layer.
For perfectly sized patches it's of import that the fabric doesn't shift during cutting. If you lot tin cut up to four layers at a time without shifting, that'south skilful.
Smart Tip!
To help hold the layers together, press the them together with your iron. Cotton wants to stick to itself. The pressure and oestrus of the fe encourage this tendency.
Can I print at 'Actual Size'?
Yep, you tin can. Print one copy, confirm information technology's the proper size and so print as many copies as yous demand.
For me, information technology's also like shooting fish in a barrel to click the incorrect push and end up with 25 copies the wrong size. I'chiliad much amend if I take to retrieve to type in '100%'.
Use whichever method works all-time for you—simply be consistent!
Do I always need to follow the grainline arrows?
Having the lengthwise grain run in the same direction through your block and, in particular, having the outside edges of your blocks onthe straight of grain brand for more stable, less stretchy blocks.
Merely the choice it ultimately up to y'all. You may non take plenty fabric to employ the grainlines. You might want to fussy cut a detail patch. There may exist other reasons you lot choose not to utilise the arrows. Just make an informed decision that works best for you lot.
After all, this is YOUR quilt!
If you find that in that location'southward all sorts of bias edges in the patches, I advise using a liberal dose of fabric starch. Information technology volition help minimize the stretching.
Click here to learn more well-nigh starching your quilting textile.
Dorothy asks...
"If your seam allowance is 1/four" why can't yous add together it to the template once instead of guessing 1/4" on each slice of cloth like it says on all directions? I guess in that location must be a reason since they all say to add it to fabric, but wouldn't be easier to add it once on the template?"
Great question, Dorothy!
I'll address each instance where quilting templates are used. (Note: I'thousand going to use the abbreviation 'SA' for seam allowance.)
Applique templates can be used with several different techniques. For fusible applique, y'all don't add any SA. For needleturn applique, you do add a seam, But...
...depending on your skill and confidence level, you may exist adding anywhere from a scant 1/8" (for teeny shapes or curvaceous shapes) up to a expert 1/4". So calculation a SA to the template would actually make for more than work.
Think of a daisy shape with many petals, all cutting as a single patch. If those petals are close enough together, calculation a seam allowance to the template may obliterate the space between the petals. The appliquer is left wondering where exactly to stitch. She'd have to go back to mark the stitching line. Actress piece of work without any gain.
For hand piecing templates, the quilter traces around the quilting template with a pencil and then cuts—with a scissor or rotary cutter—a 1/4"(or and so) past the fatigued line to add the seam. The 'exactness' of the SA isn't important. Information technology needs to be big enough so that the SA is stable and won't pull out. The quilter is actually matching the drawn line of one patch to the drawn line of the second and intentionally stitching directly on that line.
A hand-piecer doesn't have a quarter inch guide like a sewing motorcar does. She'd accept to get back and measure and marker the stitching lines. Extra work without any gain.
For the automobile piecer, yes, having the SA added to the template would brand it easy...take for one thing.
It'southward much easier to add a SA with your rotary cutter and ruler, than it is to line upwards the edge of that same ruler with a solid cut line—particularly if you lot're cutting many, many of the same template shape.
Now on the complimentary quilting templates available on this website for pieced blocks, because I drawn them using the EQ7 software, they are printed with the 1/4" added. You can come across this on the templates for the Carolina Lily quilt cake.
Still, for applique blocks like the Magnolia Bloom, no SA is added. Click here to come across those templates.
Even with those SA automatically added, I cut my shapes with templates past aligning the quarter inch marking on my ruler with the solid blackness stitching line.
I believe this makes for more accurate cuts and shapes. It's simply much easier to see. Furthermore, information technology'south no extra work, I'd still exist cutting the patch with my rotary cutter and ruler.
Dorothy, I hope this has helped. If not, please let me know using the course below. It's proficient to enquire questions when you're not sure of the 'why'. And it helps others out, too!
~~Julie Baird
This commodity was printed from Generations-Quilt-Patterns.com
Source: https://www.generations-quilt-patterns.com/free-quilting-templates.html
0 Response to "Quilt Patterns Clip Art 8 X 10 Page Backgrounds Templates Ms Word"
Post a Comment